


1
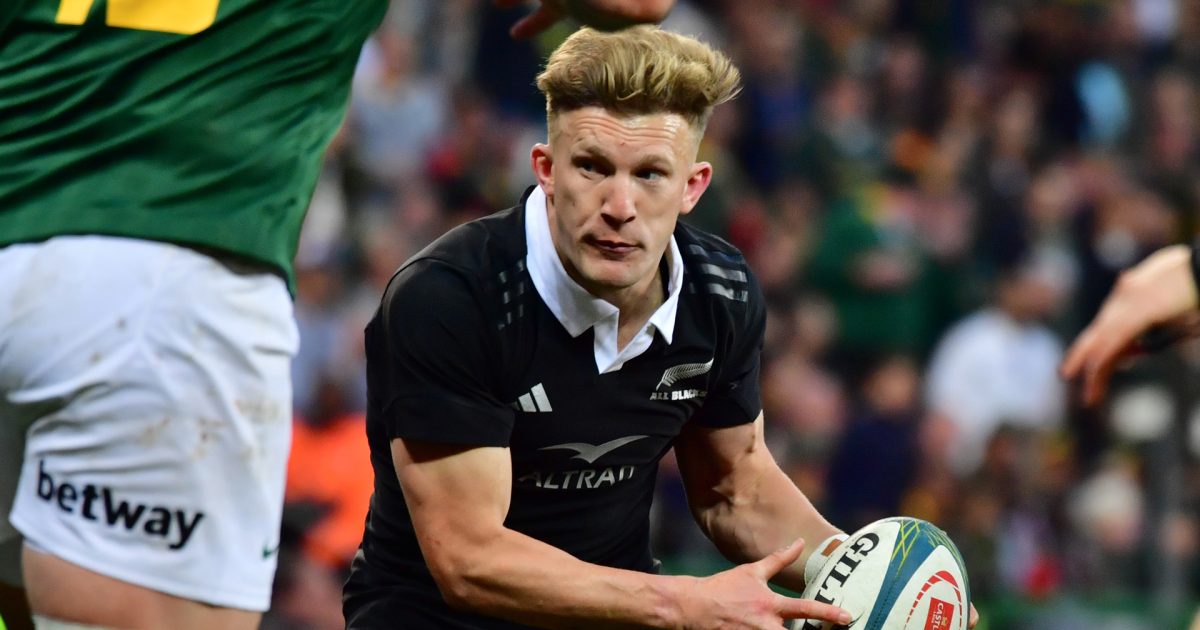
It's time to stop hating on Damian McKenzie, the best 10 in the Championship
By Ben Smith
After the first Bledisloe Cup test in Sydney the unsettling wave of criticism grew louder for All Blacks first five-eighth Damian McKenzie after a host of missed opportunities.
ADVERTISEMENT
The No 10 had up to three try scoring opportunities go awry. One from his own line break in the first half, a second from backing up inside Sevu Reece where he threw the flick pass attempt, and a third went begging with a forward pass offload that ended with Cortez Ratima crashing over.
McKenzie is a risk-taker, a gambler, and not your cookie cutter game manager in the mould of Harry Plummer.
He’s also a phenomenal attacking talent, one that the New Zealand public can’t forget so quickly.
While the calls grow louder to give up on McKenzie for a safer option, the inconvenient truth is he has been one of the All Blacks’ best players this season.
In the July series against England McKenzie delivered way above expectations, despite the clock mishap in the first Test.
Often criticised for wild decision-making and flinging high risk passes, under the storm of the English rush defence McKenzie routinely unlocked the outside space.
ADVERTISEMENT
He put the ball on the money to Sevu Reece with a cross-field kick for the opening try. He had two more clean line break assists in the first half.
He cleaned up every kick into the backfield and diffused every high ball his way. He made every tackle asked of him. There were no handling errors or poor turnovers. In a game decided by one point, he had one try assist and kicked two second half penalties to overcome a 10-15 deficit.
In the second Test win at Eden Park, McKenzie was a match-winner. Without him, they simply don’t win the game. He created enough chances for the All Blacks to be up 21-7 in the first half.
His first piece of genius was a dink chip kick in behind that he regathered and found Jordie Barrett on the burst. Codie Taylor was put in the clear but was gunned down from behind, with Sevu Reece outside him.
ADVERTISEMENT
The next was sparking a long counter-attack after fielding a long Marcus Smith kick. He split Maro Itoje and Ben Earl, breaking through the line, then put Mark Tele’a away.
Fullback Stephen Perofeta, with two men inside him, opted to pass back outside to Tele’a and the pair butchered one of the easiest finishes you will be given at Test level.
Both try scoring opportunities were sparked by McKenzie. He was just about the only player across the two Tests to cause issues for England’s defence.
Beauden Barrett was praised for his supersub performance in the second half to lift the All Blacks, but it was also McKenzie who put Barrett into space with a line break assist leading to Tele’a’s second try. The next three points came after another McKenzie pass put Sevu Reece through the line for another line break.
Again, it wasn’t just only the positive attacking plays, it was the absence of any bonehead errors and costly mistakes.
The All Blacks try of the season, scored by Sam Darry in Wellington against Argentina, came after another break sparked by McKenzie again chipping the line and regathering possession. He linked with Beauden Barrett who sent the ball infield with a big banana, and Darry scooped up the loose ball and dived over.
When the All Blacks took a 20-8 lead in that game, it was because McKenzie had put Lienert-Brown over with a try assist, a face ball across two Argentinian defenders onto the back shoulder where it needed to be.
His lone turnover was a costly forward pass to Will Jordan on a line break that led to a would-be game-sealing try to McKenzie himself, while the play many will remember cannot be solely blamed on the first five.
No one talks about Ardie Savea playing halfback and passing the ball over McKenzie’s head. Both Barrett brothers watched on as McKenzie’s pass split them, costing a five metre scrum and the eventual lead.
Bouncing back from defeat in Wellington, the All Blacks put on a first half clinic at Eden Park to dispatch the Pumas 36-3 by half-time.
McKenzie scored the first try chasing a chip from Jordie Barrett. He was involved in Caleb Clarke’s try with the second-to-last pass to put Ardie Savea into space out wide, he then put Beauden Barrett through the line for a try assist.
In South Africa McKenzie again made plays that just weren’t finished. In the fifth minute at Ellis Park he got between Ben Jason-Dixon and Damian de Allende, flicking a back hand offload to Barrett at pace.
Another genius offload by Barrett gave the All Blacks the chance to score but Ethan Blackadder butchered it by not giving the last pass.
On Caleb Clarke’s first try, a double pump by McKenzie beat Jesse Kriel and kept the ball swinging wide after the Boks’ turnover. On Clarke’s second try he put a long ball perfectly on the chest of Barrett who finished with the final pass.
McKenzie wasn’t responsible for momentum swings against the All Blacks. Barrett kicked out on the full twice and had another kicking blunder on half-time kicking directly out with time still on the clock. Multiple possessions were turned over at the breakdown.
The final quarter fade featured a number of poor plays by many, but not McKenzie.
In Cape Town he was asked to kick penalties from long range, perhaps outside his known distance, leading to key misses. Just one of the three misses was an “expected” make.
In Sydney, McKenzie carved up the Wallabies without having the polish to finish. What most will fail to recognise is that with a Harry Plummer-type No 10, two of those three missed opportunities don’t even eventuate.
Plummer is not an avid line breaker with the speed and evasiveness of McKenzie. He perhaps would have only finished the second break, backing up inside and giving a more accurate pass inside to Tamaiti Williams.
Off the bench in Wellington for the second Bledisloe McKenzie delivered a lively cameo. He was electric with every touch, skinning the Wallabies down the left touchline with a try assist for Caleb Clarke after flying into the line.
The bottom line is no player in world rugby has created as many line breaks as McKenzie has this year. He’s top of the list, while also delivering try assist after try assist.
McKenzie has a reputation as being a cowboy playmaker with rocks and diamonds plays. That reputation follows him around to his detriment, regardless of what is actually happening on the field.
This year with the All Blacks his error rate with ball-in-hand has been extremely low, he’s executed to a high level across all of the Tests providing a steady hand as a game driver. Anyone who can’t see that he’s been the All Blacks’ best attacker player this year doesn’t understand what is going on.
No other No 10 in the Rugby Championship has more attacking production than him, yet players like Tomas Albonoroz and Sacha Feinberg-Mngomezulu are being talked up as “better”.
Albonoroz had one breakout game while Feinberg-Mngomezulu, benefitting from the shiny new object syndrome, bombed tries in Perth and at the end of the Cape Town Test. The young No 10 has far more turnovers (eight in four games) and just one try assist. Not to mention he cost South Africa the Ireland series.
He’s young, exciting, and full of upside but don’t get it twisted. The All Blacks actually need McKenzie to produce, while Feinberg-Mngomezulu can take a backseat behind a dominant pack, who then cover his backside when he makes errors.
Damian McKenzie was the best No 10 in the Rugby Championship without a shadow of a doubt.
Delusional Ben Smith, thinking NZ has any players that are 1 in the world in their position. Wake up and smell the present, it must hurt living in the past.
Totally agree Ben
"Bouncing back from defeat in Wellington, the All Blacks put on a first half clinic at Eden Park to dispatch the Pumas 36-3 by half-time." - The half-time score was 35-3.
How do you get that wrong as a professional journalist? I mean honestly. That Ben Smith has a career as a writer is utterly mystifying. Surely there must be someone more competent in NZ?
true but if we react to mitchells diatrjbe we're banned
haha All comments are moderated and will be removed if offensive. Please keep it respectful.
The fact that articles like this are published to incite divide amongst people is against the spirit of the game. To quote Nigel Owens, " the soccer stadium is about 500 yards that way." This type of divisive rubbish isn't how a rugby man represents himself.
Quite right, and the worst part is that it was in reply to someone else's inciting article.
He isnt playing his normal instinctive game. Thats messaging from the coaches around changing his game....he needs the balance to be more back towards instinctive instead of play safe most of the time. He will find the balance naturally in his own way. Mounaga took years to find his feet as well, balancing the same thoughts in his head.
I am sure he will come right, but he is more of a 15 than a 10 with the way he plays. It's a shame that we don't have a proper 10 behind the best forward pack in the world right now :(
amen ben 🙏
It's pretty faint praise to be honest. None of the 1st 5/8ths in the RC particularly impressed. D-Mac still lacks top level game management and too many of his kicks under pressure are poor. Yes - he is good goal kicker and yes he is the best ball runner at 10 (probably globally). But I would be very surprised if he was starting 10 for the ABs in the 2027 RWC final
Best ball running number 10 in the world 😆 🤣 u joking arnt u bro ..always thought number 10 ran and set up his backline not run around in circles putting everyone under pressure and not knowing what's going on then throws hail Mary passes or forward passes or the next bloke just drops it because he has no idea the ball was going to come to him..did u watch Richie ran he cut though defenders like they weren't even there and pass the ball to a player for a try ..that break he made from near our 22 against Ireland in quarters and set u a beautiful try ..dmac couldn't do that if he tired 100 times ..honestly if he's the best we got then we are truly F..ked
This is what I have been saying. While the 10 position is important, there aren't really any good 10s in the world right now (maybe Ntamack).
Damien McKenzie is not the best 10 in the championship or indeed NZ. He has plenty of flair , but little game management. He is a converted 10. Richie Mo'unga is desperately needed back and it will happen. He was a miracle 10 under Robertson at the Crusaders, but Foster undermined him , start to finish. Ben Smith has his opinion , I respect that.
Why did I know who the author of this article was when I saw the headline.
because of how triggered you were?
I could imagine the punchline from reading the headline too!
No one hates Dmac, he's just never going to be good enough to be the ABs 10 use BB until we find one .
Regardless of Ben Smith’s panicky explanations and drivel, Dmac is the best 10 New Zealand’s got, full stop.
Unless Mounga becomes eligible or returns, you’ve got no other options.
Mounga isn't even close to being better
Dmac has created a lot of chances for sure Ben, but you are also ignoring some other simple facts:
1. His contestable kicking was poor
2. His tactical kicking was inconsistent
3. His goal kicking was inconsistent
4. Periods where the AB's should have been looking to consolidate momentum, they were still thinking all out attack. That's a mindset driven by the 10
You do know dmac has the most kick regathees of any other al black in the team right so your comment is poor asf he also boasted the best kicking percentage i. The rugby championship his tactical kicking was better than any other all black so what the he'll are you on about
Nar..
1. They don't have good chasers. Average and tactically different would be more accurate.
3. Dmac is an 85% kicker
4. Or by the team and coachs
I thought his tactical kicking was very consistent too, was there something you didn't like about it though?
My kids are the best in the world.
No that's the normal quality of article I expect from Ben Smith!
First Time I agree that he is the best AB player this season in saying that the bar ain't that high this season so compared to other players in other teams quite a average really
Not had a ten that's been better than him this season CT. Though I think that pretty much qualifies you're statement, even of the teams they haven't faced theres not really much quality out there.
The criticism I have of DMac is that when the game gets crazy, he get's crazier, and he always responds to pressure with risk.
When we are really under the pump, and desperate to take a breath and regroup, that is when he is most likely to throw a crazy pass or try a chip and chase.
He is a generational talent, but he has these moments where he decides a try need to be scored in the next phase, regardless of field position or game situation.
He is yet to provide himself capable of playing a tight controlled game when he needs to.
That's based off his Full Back playing days right? You haven't seen that happen this year (I would argue in the Bleds when he had as much space as a FB).
He is full on for sure, he sees no reason not to take advantage of an opportunity?
He's played several tight controlled games this year, if you're talking about tight contests against constricting teams while making no mistakes. If you just mean, 'he's not "just done nothing" or, "only done the bare minimum"', yeah I think that agrees with ^^. Why do you want to see that?
I read and agreed with some points this article and was just surprised to find at least one Ben Smith article that is worth it, but then he couldn't help himself. More BS at the end and that is no surprise.
Haha I get the feeling that's where the Bullseye always was HH!
More delusional BS from Ben Smith. I give him credit for getting the comments going though. Kind of all he's good for, and I think he and RugbyPass know that. He's got to put food on the table He knows his rugby knowledge and analysis just isn't going to cut it.
It could be true. It's clearly a third rate comp anyway. So does it really matter?
All the teams in it are overrated and require direct interference from the refs to win
1. Rugby World Cup
2. World Test Championship
3. The Rugby Championship
4... 7 Nations.. wait no.. something the other half of WTC
5. Super Rugby
Has anybody noticed how DMac has integrated elements of another player into his game this season?
This player that has been mentioned several times these past three years by kiwi’s and also mentioned that they were “watching him closely” and “doing a lot of analysis on him”.
By the way, the kiwis are not the only ones who have been watching other players closely…
The bits & pieces he has implemented have delivered a mixed bag of results so far, so much retrofitting you can try to get a Ferrari engine into a Honda Civic. It either fits or it doesn’t.
Possible reason could be that DMac does not have the ability to mimic another player or because the player is just way more talented than DMac.
My money is on the latter and this is why he was eventually dropped.
Won’t be surprised if Razor brings in another 10 next month.
DMac = Poor man's version of Manie Libbok.
Nice!
Top goal kicking version of Manie Libbok. What South Africa used to have!
Mate he wasn't dropped it was TJ last game at wellington so they put him with Barrett as the last dance did u not read the Internet or the paper
That day?
We love it when DMac plays against the Boks. Definitely not a great 10.
Sorry for our Bok flyhalves too, but the best 10 in the RC this year was that small lad from Argentina. By far....
NZ RUGBY: Mirror mirror on the wall who is the greatest 10 of them all
MIRROR: The greatest 10 of them all is Handre Pollard
NZ Rugby: Quickly let's break the mirror
I'm pretty sure Mark Robinsons face would have already cracked it by then.
Finally I agree with Ben Smith. Thankfully I didn’t waste any time actually reading his article but suffice to say I think NZ must persist with DMac and keep him firmly in the 10 jersey.. you defo don’t need Mounga back when DMac is there to pull the strings..
Agreed all season for the all blacks I've seen he's the only one setting something up or Brecking the line mostly every line Breck he's had a hand in it but just hating cause of what didn't go well and they don't see the bigger picture
This is a joke, stats against two average sides doesn’t matter. There is no way he is better than the three other SA flyhalfs. A better kicker than libbok but that’s it. NZ are in major trouble if this is the best they have, exceptionally poor when the game is in the melting pot (last 20mins), behind a non dominant pack and decision making under pressure. A better and good bench option he would be.
Yes, the All Black pack is dominant of South Africa's with a two man advantage!